In this subcourse, we develop a PaaS for Web services. The concept of the PaaS lies on the immutable infrastructure; which tries to separate programs from mutable data. In this couple of years, more flexible platforms such as Docker hav been developed. It is nice and cool to use but the architecture is a bit complicated. So we start from Web hosting and early-generation PaaS cloud targeting for Ruby on Rails Web applications in this subcourse.
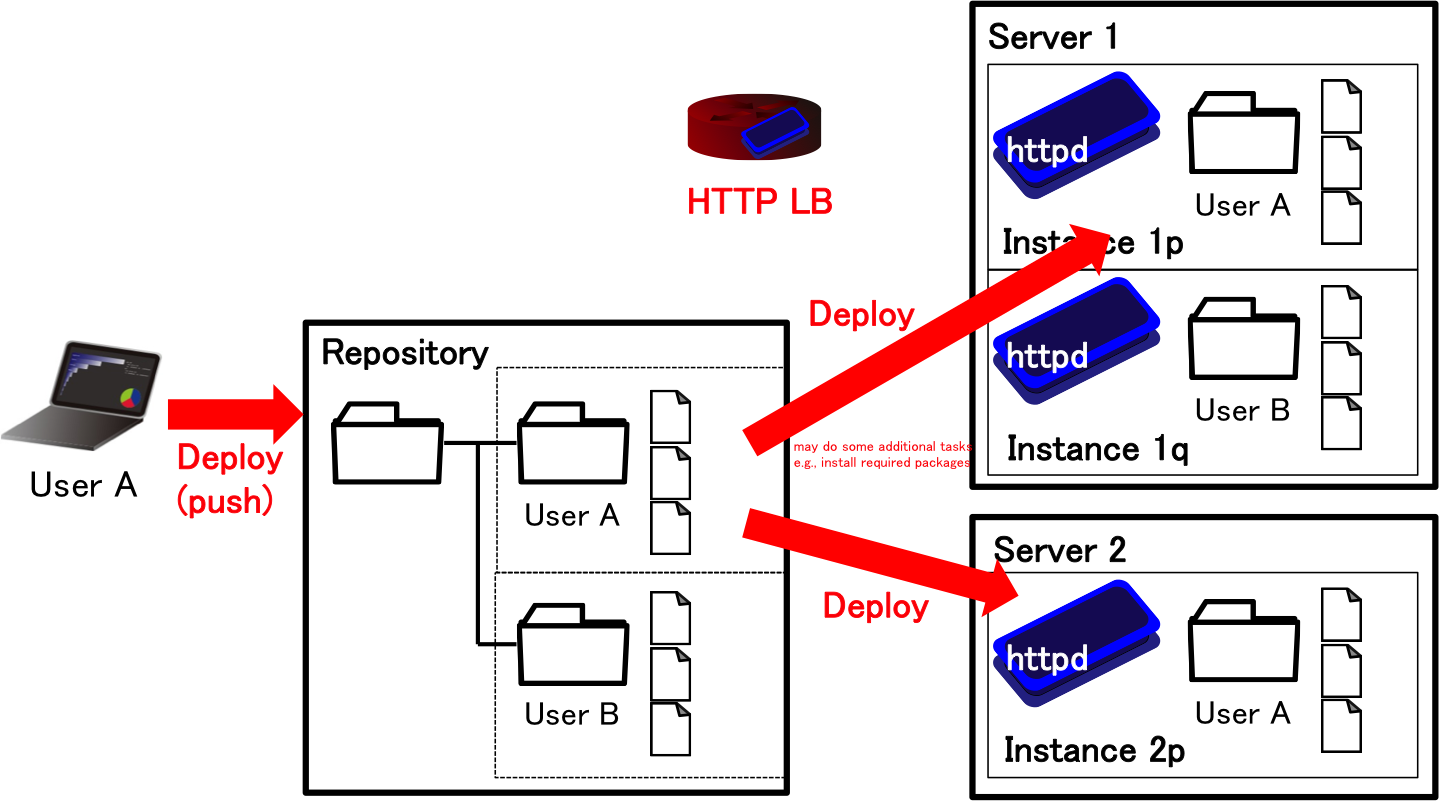
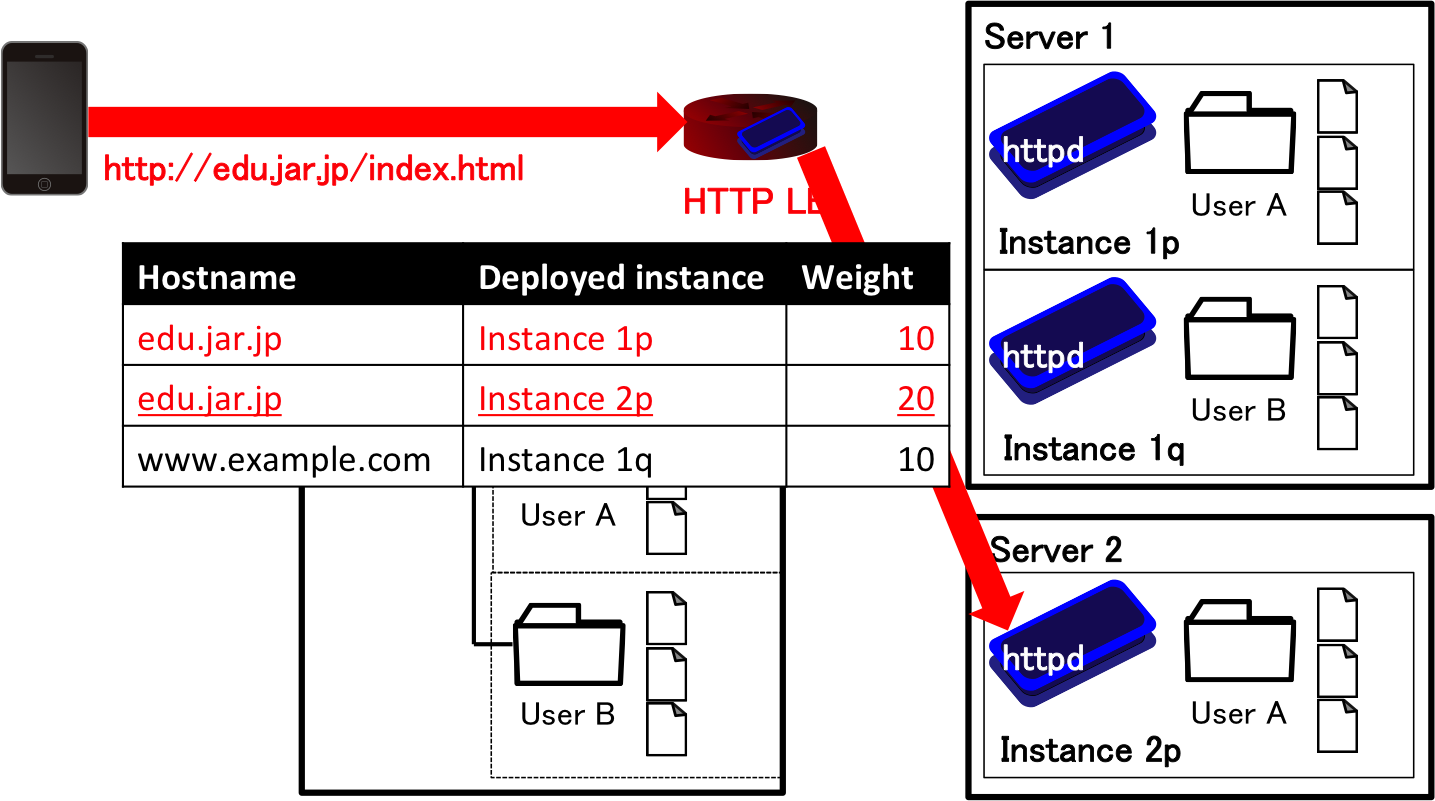
We summarize the components of our developing PaaS. Our developing PaaS consists of four components; 1) HTTP load balancer, 2) (lightweight) virtual machines, 3) program repository, and 4) backend database. Figure 1 and 2 illustrate the overview of PaaS for Web services. In the deployment of developer's program set into the PaaS, the developer upload the set of programs using git to the repository in the PaaS. As soon as the PaaS receives the program set, the PaaS deploys the program set to the developer's instances. The PaaS manages the topology of the instances, and configures HTTP balancers so that HTTP balancers redirect users' request to one of the instances of requested service using the hostname. The PaaS may support elastic auto-scaling (scaling out/in) by creating/destloying some instances. Since the programs cannot write the data to the instances to support this scalability, a backend database shall be located behind the instances.
Although our goal is a PaaS for Ruby on Rails, we begin with a simple static page hosting to understand how the PaaS works. To tell the truth, I found we had less time to complete everything when I tried to develop a PaaS as a sample code.
We show an example of the node configuration from your two physical machines in Figure 3. The load balancer (and the database server possibly in future work) will be installed on a physical machine, and the repository server and developers' instances will be on LXC instances.
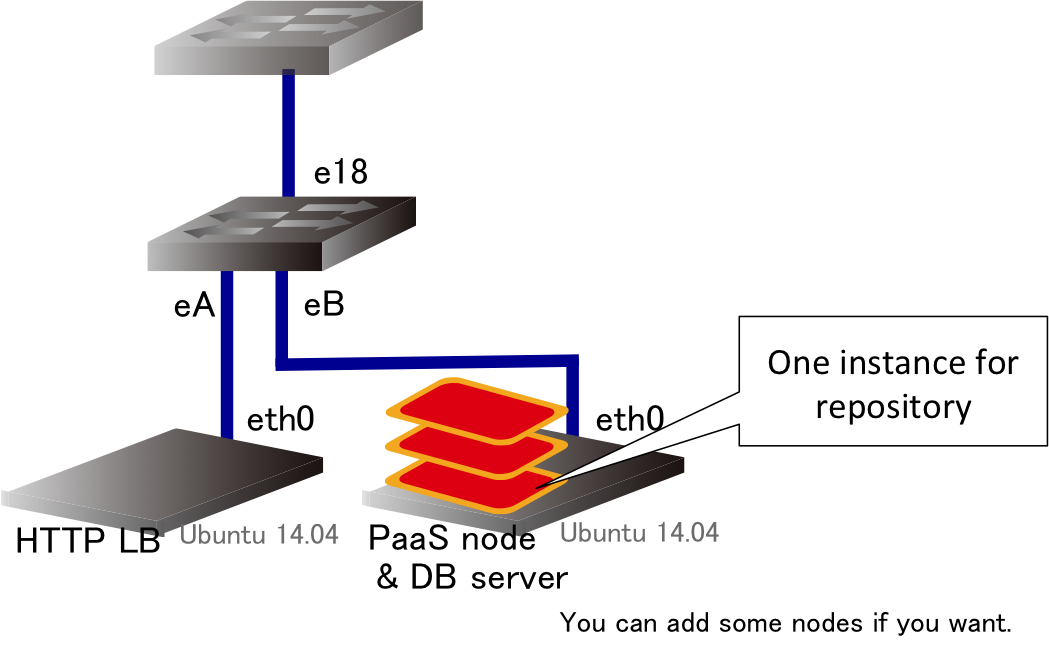
Figure 4 illustrates our first version to develop, called mini PaaS. When a developer pushes their code to the repository, the PaaS creates a new instance and deploy the code to it. Then, the PaaS adds a route to the new instance, and deletes a route to the current (old) instance. Now, we can delete the old instance, so destroy it.

Note that I configure a wildcard DNS domain name, <any-name>.p<two-digits>.exp.ci.i.u-tokyo.ac.jp, to return an A record, 157.82.3.<two-digits>. For example, we get 157.82.3.110 for example.p10.exp.ci.i.u-tokyo.ac.jp. You will use this to host multiple developers' instances and direct the requests to the HTTP load balancer.
To allow developers to access the repository server via git, accounting is needed. However, we would not like to provide developers with access to the server (e.g., shell) except for the developer's own git repositories. The gitolite tool allows us to do this access control. All developers are allowed to access to the server with a dedicated username such as git with their ssh public key, and the tool identifies a user by the public key to control the access to repositories.
We now set the gitolite up on a repository server. Make sure that the repository server is one of the LXC instances. First, we create an administrator's account for the gitolite, then switch to the administrator and create an SSH key pair.
#
#
$
$
useradd -m gitadmin -s /bin/bash
su - gitadmin
ssh-keygen -b 4096
cp .ssh/id_rsa.pub /tmp/admin.pubNext, we create a common account for developers (users), and finish the initial setup of gitolite by gl-setup command, which import the administrator's public key.
#
#
$
useradd -m git -s /bin/bash
su - git
gl-setup /tmp/admin.pubAfter the initial setup, a directory for all repositories are created at the current directory, /home/git/repositories.
The users and repositories in gitolite are also managed by one of the repositories. To see it, we switch to the administrator's account and clone it.
#
$
su - gitadmin
git clone ssh://git@localhost/gitolite-adminThe gitolite-admin/conf/gitolite.conf file is a file to configure the repositories and their access permissions, and the gitolite-admin/conf/keydir directory stores the user keys; the file name format must be <username>.pub. Note that each file can have only one key (unfortunatelly) in the current implementation of the gitolite.
It is very simple to add a user. What you need to do is placing a user's SSH public key at gitolite-admin/conf/keydir/<username>.pub and commit and push it.
#
$
$
$
$
su - gitadmin
cd gitolite-admin
git add conf/keydir/<username>.pub
git commit -m "add <username>"
git push
The repositories are managed in a textual formatted file at gitolite-admin/conf/gitolite.conf. To add a repository named <username>/<repository>, just do the following.
#
$
$


$
$
su - gitadmin
cd gitolite-admin
echo "repo <username>/<repository>
RW+ = gitadmin
RW = <username>
R = <read-only-user-for-instance>" >> conf/gitolite.conf
git commit -m "add <username>/<repository>" conf/gitolite.conf
git push
I prefer to prepend user name to the name of a repository to separate the name space but it is not mandatory. The <read-only-user-for-instance> user is intended to use to clone the repository from instances to deploy code.
We use the nginx as the HTTP load balancer in this subcourse. It is managed by the apt package manager, so just do the following to install it.
$sudo apt-get install nginxI (personally) opt to forward the port number of the clients to instances because carrier grade NATs are widely deployed in these days. So, please add the following line (second line) to the /etc/nginx/proxy_params file.
+proxy_set_header X-Real-IP $remote_addr;
proxy_set_header X-Real-Port $remote_port;When I tested last year, I need to change the following configuration in the /etc/nginx/nginx.conf file.
-
+
# server_names_hash_bucket_size 64;
server_names_hash_bucket_size 64;To start the nginx daemon, you can type:
#service nginx startWhen you reload the configuration without stopping the service you can use reload:
#service nginx reloadBefore going to the automation, let's begin with manual configuration. Provided that we host the foo.p10.exp.ci.i.u-tokyo.ac.jp domain name and direct to instance1.ip.address:80 (this should be IP address of the instance1) and instance2.ip.address:80, you need to first edit /etc/nginx/sites-available/foo.p10.exp.ci.i.u-tokyo.ac.jp as follows.
server {
        listen 80;
        server_name foo.p10.exp.ci.i.u-tokyo.ac.jp;
        location / {
                proxy_pass  http://lxc.foo.p10.exp.ci.i.u-tokyo.ac.jp;
                include /etc/nginx/proxy_params;
        }
}
upstream lxc.foo.p10.exp.ci.i.u-tokyo.ac.jp {
        server instance1.ip.address:80;
        server instance2.ip.address:80;
}
Then, link the file into the /etc/nginxsites-enabled directory (and reload the server, of course).
#
#
ln -s /etc/nginx/sites-available/foo.p10.exp.ci.i.u-tokyo.ac.jp /etc/nginx/sites-enabled/foo.p10.exp.ci.i.u-tokyo.ac.jp
service nginx reloadIn the LXC instance, we need to install a web server. Install the nginx or other web servers such as Apache. There are so many documentations about this, so try to search how to do it. Upon the deployment, what the LXC instance should do is just to clone the contents of repository to the document root of your Web server.
The steps described above can be manually done. To automate this, the event of git push to a repository must be notified to the PaaS. In the git, an event handler script named post-update is called after the push to the repository. So, you can place a script to /home/git/repositories/<username>/<repository>.git/hooks/post-update in the repository server. Note that the it must have the executable permission (chown git <file> chmod +x <file>). An example of the event handler script is shown in the following.
## Only master branch is the target
BRANCH=$(git rev-parse --symbolic --abbrev-ref $1)
if [ "$BRANCH" != "master" ];
then
        echo -n "No active hook for this branch."
        exit
fi

/path/to/event/handler.sh username repository any-other argumentsIn the previous section, you understand each component of PaaS. The next steo is automation for static pages. I hope you to proceed to support a Web framework, Ruby on Rails, with a backend database server as the data store.