In this subcourse, we develop a cloud controller using libvirt API to provide users with an interface to operate an Infrastructure as a Service (IaaS) cloud with a number of hypervisor machines. Cloud controllers manage the virtual resource provisioning network infrastructure, and accounting.
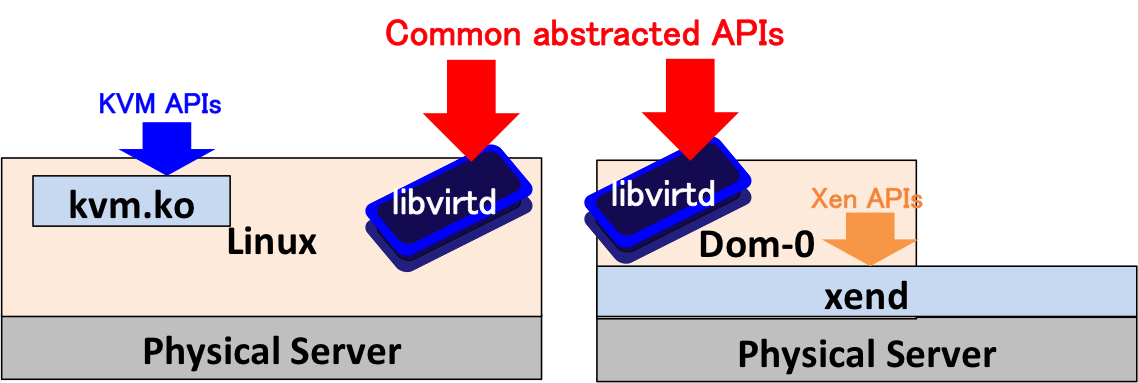
To develop an interface to IaaS cloud, we use a library, named libvirt, that provides a common API to various implementations of hypervisors such as Linux KVM and Xen. Figure 1 illustrates the overview of the libvirt API architecture. The virt-manager used in a prior class is one of the applications using the libvirt API. Another application is a command line tool (shell), named virsh.
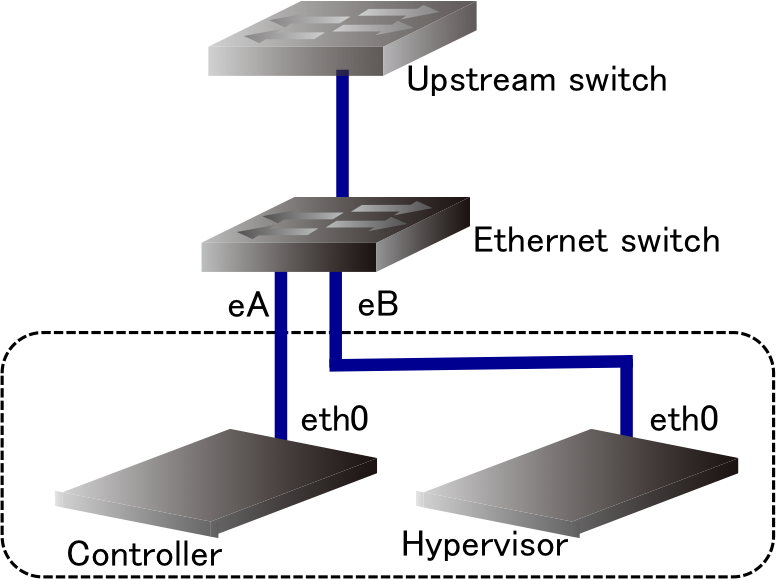
We will use two physical machines; one machine for the cloud controller and another as a hypervisor machine. The physical topology is definitely simple as shown in Figure 2. In the real environment, it is better to separate the network segment of management (i.e., connection between the controller and hypervisors) from the service network (i.e., the Internet), but we do not in this subcourse for the simplicity.
The libvirt API relies on the Transport Layer Security (TLS). Although it supports password authentication, we use the client-certificate authentication instead of password authentication because password authentication is not good to operate it in server programs; the password might be hardcoded in a program. The client-certificate authentication is similar to the server verification scheme in HTTPS; the certificate signed by a certificate authority is verified by a preinstalled public key of the authority. This key infrastructure is called the public key infrastructure (PKI). One difference from the PKI used in the Web services, i.e., HTTPS, is that we will construct our own PKI by ourselves instead of the use of existing PKI. This is because we (our hypervisors) do not trust any other certificate authorities but just do us.
Since the libvirt API adopts a client-server model, we will install a client certificate (key pair) to the controller, and install a server certificate (key pair) to the hypervisors. We also need to install the certificate of our certificate authority (of course not its private key).
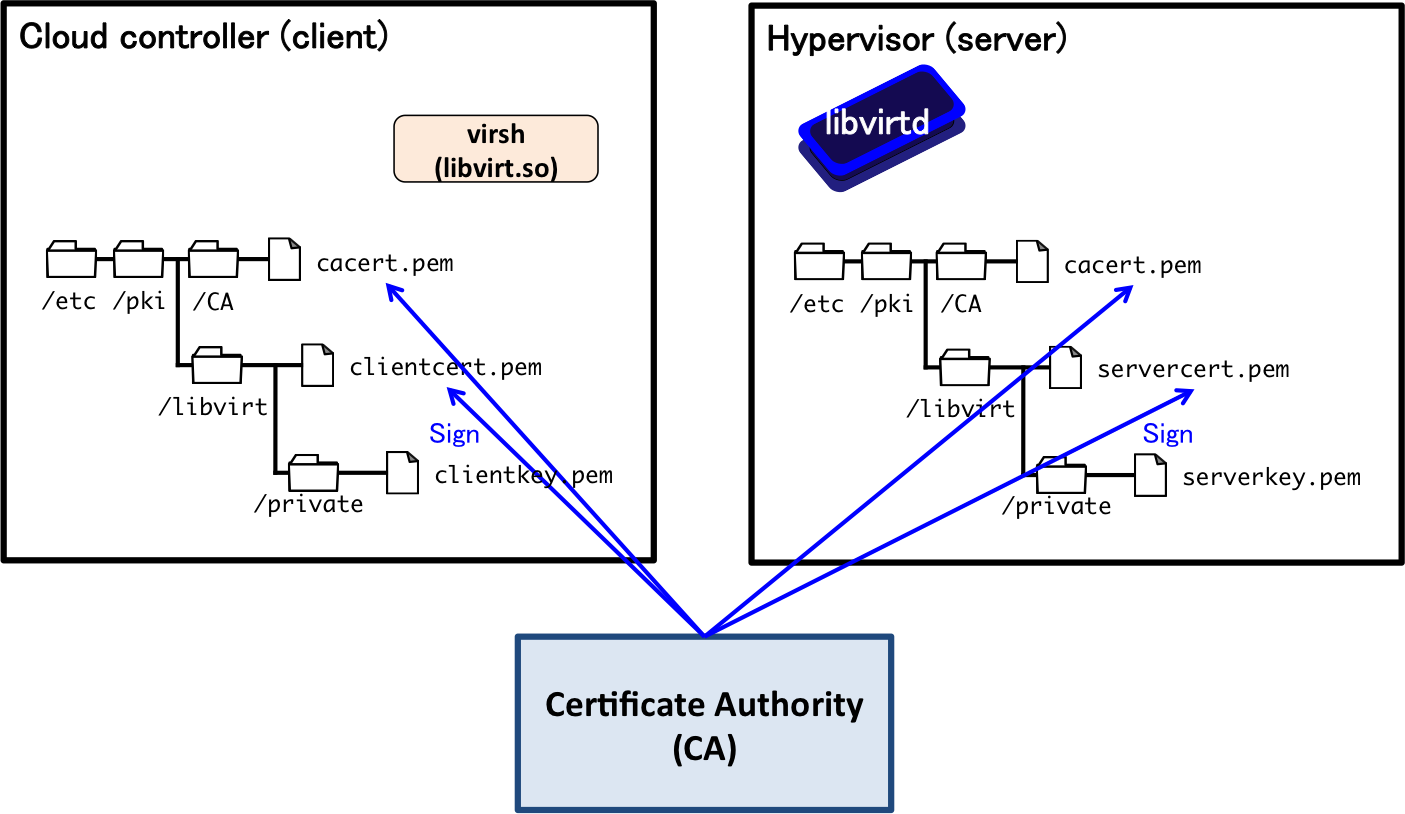
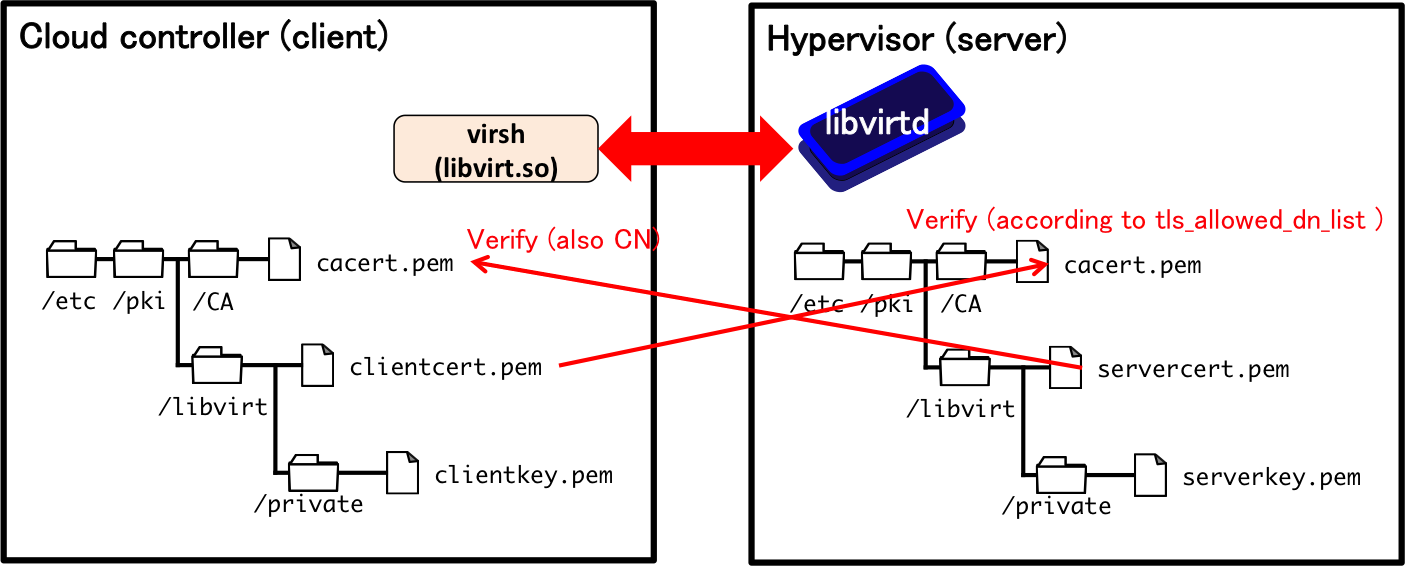
Figure 3 illustrates the directory structure of client/server certificates for the libvirt API. Each of the controller and the hypervisor is required to generate a key pair (public and private key) and the public key (certificate) shall be signed by a certificate authority. Figure 4 shows the overview of the client-certificate authentication. As we see in HTTPS, the server certificate as well as the client certificate is verified according to the signature of a certificate authority. This authentication/verification is achieved with the preinstalled certificate of certificate authorities (/etc/pki/CA/cacert.pem in this figure).
As mentioned above, we need our own certificate authority. We will prepare our certificate authority in the controller by the following steps.
First, we will create a working directory to store CA information and certificates, then move there.
#
#
mkdir -p /var/caroot
cd /var/carootThen, we copy the default configuration of openssl that is a toolset for the PKI (creating a certificate, signing it, etc.). We will use the default configuration in this course, but edit it if you need.
#cp /etc/ssl/openssl.cnf ./Now we create our own certificate authority. A tool for a certificate authority is already installed at /usr/lib/ssl/misc/CA.sh, so you can use this to create a certificate authority with the following command. A few attributes prompt you to input, but I don't think you need explanation about them here. This information will be shown in certificates you would sign.
#
SSLEAY_CONFIG="-config ./openssl.cnf" /usr/lib/ssl/misc/CA.sh -newca
CA certificate filename (or enter to create) [RET]
Enter PEM pass phrase: [Password for CA certificate]
Country Name (2 letter code) [AU]:JP
State or Province Name (full name) [Some-State]:Tokyo
Locality Name (eg, city) []:
Organization Name (eg, company) [Internet Widgits Pty Ltd]:The University of Tokyo
Organizational Unit Name (eg, section) []:
Common Name (e.g. server FQDN or YOUR name) []:IST Cloud Private Certification Authority 00
Email Address []:
Remember that now your certificate authority is created under the demoCA directory. The certificate of your certificate authority is located at ./demoCA/cacert.pem and this must be copied to /etc/pki/CA/cacert.pem at both your controller and hypervisors.
In the usual operations of a certificate authority, a key pair for the client/server certificate is generated at another machine than the certificate authority and send a public key as a certificate signing request to the certificate authority. In this subcourse, however, the operators of the certificate authority and clients/servers are identical, so we can generate them at the certificate authority (this is much simpler).
Before proceeding to the next steps, please create the directories used by the libvirt in advance:
#
#
#
mkdir -p /etc/pki/libvirt/private
chmod 0700 /etc/pki/libvirt/private
mkdir -p /etc/pki/CA/You can generate a client certificate by the following command. The common name is not checked by servers, so you can use any names you want.
#
SSLEAY_CONFIG="-config ./openssl.cnf" /usr/lib/ssl/misc/CA.sh -newreq
Country Name (2 letter code) [AU]:JP
State or Province Name (full name) [Some-State]:Tokyo
Locality Name (eg, city) []:
Organization Name (eg, company) [Internet Widgits Pty Ltd]:The University of Tokyo
Organizational Unit Name (eg, section) []:
Common Name (e.g. server FQDN or YOUR name) []:myclontroller
The private key is generated at newkey.pem. It is generally not good to remove the password but it bothers you when you develop programs for the IaaS controller. Thus, we remove it as follows; newkey.nopass.pem is the unencrypted private key. Please use caution to secure the private key (check the file permission etc.).
#openssl rsa -in newkey.pem -out newkey.nopass.pemThe certificate signing request is also generated at the directory (newreq.pem), so we then sign the certificate by the following command.
#
SSLEAY_CONFIG="-config ./openssl.cnf" /usr/lib/ssl/misc/CA.sh -sign
Sign the certificate? [y/n]:y
1 out of 1 certificate requests certified, commit? [y/n]y
Thus, the signed certificate and the corresponding private key are generated. You need to copy them to your controller's libvert certificate directory; copy newkey.nopass.pem to /etc/pki/libvirt/private/clientkey.pem and newcert.pem to /etc/pki/libvirt/clientcert.pem. Do not forget to copy the certificate of your certificate authority to /etc/pki/CA/cacert.pem too.
You can generate a server certificate by the following command, too. Unlike client certificates, the common name of the server certificate must match the FQDN (or IP address) of the hypervisor. If you access to the hypervisor via qemu+tls://myhypervisor.example.com/system, the common name must be myhypervisor.example.com.
#
SSLEAY_CONFIG="-config ./openssl.cnf" /usr/lib/ssl/misc/CA.sh -newreq
Country Name (2 letter code) [AU]:JP
State or Province Name (full name) [Some-State]:Tokyo
Locality Name (eg, city) []:
Organization Name (eg, company) [Internet Widgits Pty Ltd]:The University of Tokyo
Organizational Unit Name (eg, section) []:
Common Name (e.g. server FQDN or YOUR name) []:myhypervisor.example.com
The private key is generated at newkey.pem. We remove the password from the key by the same reason as the client certificate; newkey.nopass.pem is the unencrypted private key. Please use caution to secure the private key (check the file permission etc.).
#openssl rsa -in newkey.pem -out newkey.nopass.pemThe certificate signing request is also generated at the directory (newreq.pem), so we then sign the certificate by the following command.
#
SSLEAY_CONFIG="-config ./openssl.cnf" /usr/lib/ssl/misc/CA.sh -sign
Sign the certificate? [y/n]:y
1 out of 1 certificate requests certified, commit? [y/n]y
Thus, the signed certificate and the corresponding private key are generated. You need to copy them to your hypervisor's libvert certificate directory; copy newkey.nopass.pem to /etc/pki/libvirt/private/serverkey.pem and newcert.pem to /etc/pki/libvirt/servercert.pem. Do not forget to copy the certificate of your certificate authority to /etc/pki/CA/cacert.pem too.
Now we launch libvirt daemon at your hypervisor to allow remote access to your controller. To accept a remote request, it needs to open a socket for the libvirt API. Edit the configuration file located at /etc/default/libvirt-bin as follows (- denotes deletion and + denotes addition).
-
+
libvirtd_opts="-d"
libvirtd_opts="-d -l"You also need to configure the client certificate authentication at your hypervisor. To allow the access from the certificate signed by our certificate authority, please specify the attributes of your certificate authority in the /etc/libvirt/libvirtd.conf file like:
+tls_allowed_dn_list = ["C=JP,ST=Tokyo,O=The University of Tokyo,CN=*"]This means that the attributes of the signature of the certificate must match them; Country=JP, State=Tokyo, Organization=The University of Tokyo.
Now all the configuration is completed, then launch the libvirt daemon by the following command.
#service libvirt-bin restartIf the packages used in this subcourse have not been installed to the controller, please install them beforehand by the following command.
$sudo apt-get install libvirt-bin libvirt-dev python-libvirt libvirt-rubyimport libvirt
## Return the UUID list of all the virtual machines defined in the hypervisor
def listAllVMUUIDs(uri):
hv = libvirt.open(uri)
if hv is None:
return False
vms_uuid = []
## Obtain running virtual machines
running_vms = hv.listDomainsID()
for vmid in running_vms:
uuid = hv.lookupByID(vmid).UUID()
vms_uuid.append(uuid)
## Obtain defined but not running virtual machines
defined_vms = hv.listDefinedDomains()
for vmname in defined_vms:
uuid = hv.lookupByName(vmname).UUID()
vms_uuid.append(uuid)
return vms_uuid
if __name__ == "__main__":
## List all virtual machines’ UUID defined at the hypervisor of the specified URI
print listAllVMUUIDs(“qemu+tls://myhypervisor.example.com/system”)
#!/bin/sh

## Storage directory for VMs
STORAGE_DIR="/var/vmpool/”

vm_uniq_name=$1
ssh_pub_key=$2

## Only one process is allowed
[ -f /tmp/my_cloud_controller.lock ] && exit 1
## Lock
touch /tmp/my_cloud_controller.lock
trap ‘rm -f /tmp/my_cloud_controller.lock’ 1 2

## Check if /dev/loop0 is available
losetup -a | grep "/dev/loop0"
RET=$?
if [ $RET -eq 0 ];
then
    echo "Error: /dev/loop0 is busy"
    exit 1
fi

## Copy the template image file to new VM’s image file
cp -f "${STORAGE_DIR}template.img" "$STORAGE_DIR$vm_uniq_name.img"

## Mount the new VM’s image file to put SSH pub key
losetup "/dev/loop0" "$STORAGE_DIR$vm_uniq_name.img"
kpartx -a "/dev/loop0"
mount "/dev/mapper/loop0p1" "/mnt” ## NOTE: Please change the partition #

## Write the key
echo "writing key: $key"
echo "$ssh_pub_key" > "/mnt/home/cloud/.ssh/authorized_keys"

## Unmount
umount "/mnt"
kpartx -d "/dev/loop0"
losetup -d "/dev/loop0”

## Create a VM and start it
virsh -c qemu+tls://myhypervisor/system define $vm_uniq_name.xml ## Assume that $vm_uniq_name.xml is already created by another program
virsh -c qemu+tls://myhypervisor/system start $vm_uniq_name

## Unlock
rm -f /tmp/my_cloud_controller.lock
In the previous sections, we have installed essential packacges, prepared a public key infrastructure to securely control hypervisors via the libvirt API, and developed a simple program to control hypervisors. However, we still need further fundamental components to develop a cloud controller. So, please discuss the design of your own cloud controller with your group members, and develop it! I list some keywords as follows.